There’s something truly satisfying about the combination of crispy breaded chicken and a warm, aromatic curry sauce, all served over a steaming bowl of rice. This Katsu curry recipe brings together the best of both worlds, offering a perfect balance of texture and flavor that makes it a beloved dish in Japanese households and beyond. Whether you’re looking for a hearty meal to enjoy on a cozy evening or simply want to explore a new dish, this katsu curry recipe is sure to impress.
History
Katsu curry is a delightful fusion dish that brings together Japanese culinary finesse and Western influences. The term “katsu” is derived from the English word “cutlet,” introduced to Japan during the Meiji era when Western cuisine began to influence Japanese cooking. The curry sauce itself is adapted from the Indian curries introduced to Japan by the British Navy, and it has been uniquely modified to suit Japanese tastes. Today, katsu curry is a beloved comfort food, often enjoyed in homes, restaurants, and even school cafeterias across Japan.
Serving Suggestions
Katsu curry is traditionally served with steamed Japanese short-grain rice, which perfectly absorbs the rich curry sauce. To add a touch of freshness and a bit of crunch, consider garnishing the dish with finely sliced spring onions. A side of pickled ginger or fukujinzuke (Japanese pickled vegetables) will add a pleasant tanginess that complements the curry’s warmth. For a complete meal, serve alongside a crisp green salad with a light sesame dressing or some steamed broccoli for added colour and nutrition.
Storing Instructions
If you find yourself with leftovers, you can store the components of katsu curry separately to maintain their quality. Keep the curry sauce in an airtight container in the refrigerator for up to three days. The chicken katsu can be refrigerated in a separate container for up to two days. If you’d like to store the chicken longer, consider freezing it after it has cooled completely—wrap it tightly in plastic wrap and place it in a freezer-safe bag for up to one month. Reheat the frozen katsu directly from the freezer without thawing to keep it crispy.
Reheating Instructions
To reheat the curry sauce, simply pour it into a saucepan and warm it over low heat, stirring occasionally until it reaches your desired temperature. If the sauce thickens too much, you can add a splash of water or chicken stock to loosen it up. To reheat the chicken katsu, preheat your oven to 180°C (350°F). Place the chicken on a baking tray and heat for 10-12 minutes, or until warmed through and crispy again. Avoid microwaving the chicken katsu, as it may become soggy.
Conclusion
We hope this katsu curry recipe brings a taste of Japan’s comforting flavours to your kitchen. Whether it’s your first time trying this dish or you’re a seasoned fan, we’d love to hear how it turned out for you! Share your experiences or any tweaks you made in the comments below. Don’t forget to sign up for our newsletter to receive more delicious recipes straight to your inbox.
How to Make Katsu Curry Recipe
Yum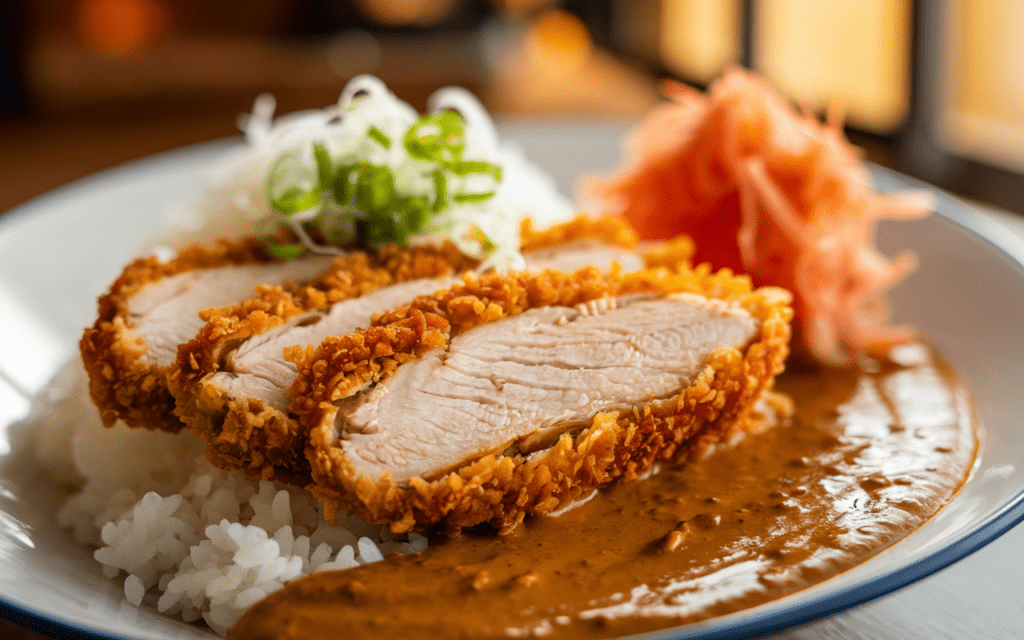
Katsu Curry Recipe
Description
This katsu curry recipe brings together golden, crispy chicken katsu with a rich and aromatic curry sauce, served over fluffy Japanese rice. Perfectly balanced with flavours of ginger, garlic, and coconut milk, this comforting dish is easy to make and sure to become a family favourite. Serve it with a side of pickled ginger or fukujinzuke for an authentic Japanese touch.
Ingredients
Instructions
Prepare the Curry Sauce:
-
Sauté Aromatics
Heat the vegetable oil in a large saucepan over medium heat. Add the finely chopped onion, minced garlic, and grated ginger. Sauté until the onion becomes translucent.
-
Cook the Carrots
Add the peeled and chopped carrots to the saucepan and continue to cook for about 5 minutes, until they begin to soften.
-
Add Spices and Flour
Stir in the medium curry powder, ground turmeric, and plain flour. Cook for an additional minute, stirring constantly to combine the flavours.
-
Add Liquids
Gradually pour in the chicken stock while stirring continuously to avoid lumps. Bring the mixture to a gentle simmer.
-
Incorporate Coconut Milk and Seasonings
Add the coconut milk, soy sauce, honey, and sugar to the saucepan. Allow the sauce to simmer for 15-20 minutes, stirring occasionally until it thickens. Season with salt to taste.
-
Blend the Sauce
For a smooth curry sauce, use a stick blender to blend the mixture or pass it through a sieve. Set the sauce aside while you prepare the chicken katsu.
Prepare the Chicken Katsu
-
Flatten the Chicken Breasts
Place each chicken breast between two sheets of plastic wrap or in a resealable plastic bag. Use a rolling pin or meat mallet to pound the chicken breasts to an even thickness.
-
Set Up the Breading Station
Prepare three separate plates: one with seasoned plain flour, one with beaten eggs, and one with Japanese panko breadcrumbs.
-
Bread the Chicken
Coat each flattened chicken breast first in the seasoned flour, then dip it into the beaten eggs, and finally coat it thoroughly with the panko breadcrumbs, pressing lightly to ensure the breadcrumbs adhere well.
-
Fry the Chicken
Heat the vegetable oil in a large frying pan over medium heat. Once the oil is hot, add the breaded chicken breasts. Fry for 5-6 minutes on each side until golden brown and cooked through. Remove the chicken from the pan and drain on paper towels.
Serve
-
Slice the Chicken
Once the chicken has rested for a few minutes, slice it into strips.
-
Plate the Dish
Place a serving of cooked short-grain Japanese rice on each plate. Arrange the sliced chicken katsu on top of the rice.
-
Add the Curry Sauce
Ladle the warm curry sauce generously over the chicken and rice.
-
Garnish and Serve
Garnish with thinly sliced spring onions and serve with pickled ginger or fukujinzuke on the side if desired.
Nutrition Facts
Servings 4
- Amount Per Serving
- Calories 650kcal
- % Daily Value *
- Total Fat 25g39%
- Saturated Fat 10g50%
- Cholesterol 140mg47%
- Sodium 900mg38%
- Potassium 700mg20%
- Total Carbohydrate 70g24%
- Dietary Fiber 5g20%
- Sugars 10g
- Protein 40g80%
- Vitamin A 5000 IU
- Vitamin C 10 mg
- Calcium 60 mg
- Iron 4 mg
- Vitamin D 2 IU
- Vitamin E 3 IU
- Vitamin K 20 mcg
* Percent Daily Values are based on a 2,000 calorie diet. Your daily value may be higher or lower depending on your calorie needs.
Note
- Customizable Spice Level: Adjust the amount of curry powder or add cayenne pepper to increase the heat according to your preference.
- Alternative Protein Options: Pork, beef, or tofu can be used instead of chicken for a different twist on this dish.
- Make it Gluten-Free: Substitute plain flour with gluten-free flour and use gluten-free panko breadcrumbs to make this dish suitable for gluten-sensitive individuals.
- Crispy Chicken Tip: For extra crispy chicken katsu, double fry the chicken by frying it twice at a lower temperature first, then again at a higher temperature.


